

Are you a beginner garment sewer? Me too! If you are interested in learning more about sewing from patterns, keep an eye out for more of my Pattern Walkthrough posts and we can learn together!

I have a couple of sewing resolutions for 2013… One of the biggest being I want to make myself some outfits. I’m 6 feet tall with a LONG waist, so it’s difficult finding clothes that fit.
I saw this pattern on a model in JoAnn’s:

Read on for a full pattern walkthrough…
Looking past what I think is an unfortunate fabric choice, I knew this was a dress I would LOVE to wear. Peplums are still pretty trendy, and it’s a trend I’m hoping lasts for a while. Peplums are very figure flattering, allowing the wearer to don a pencil skirt while camouflaging any muffin-top hip lumps (I’ve got a pair).

Peplum Trend Collage by styleandcheek.com

Burberry Peplum dress – yours for just $1095!
Let’s get to the pattern… I chose Style D, but I opted not to make the little button tabs.
First things first, time to put vanity aside and get accurate body measurements. 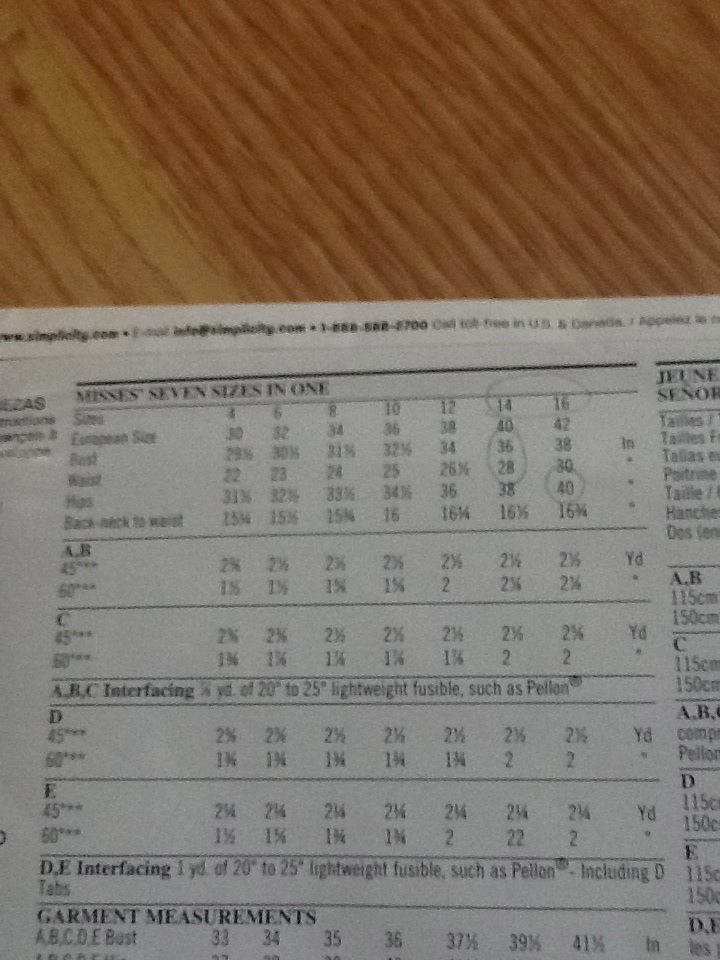
Now I buy a size 6/8 jean at Target, but here in pattern land that translates to a 14/18. My hip measurement was size 18, but I took a look at the pattern pieces and saw that there was over 5 inches of ease allotted in the pattern.
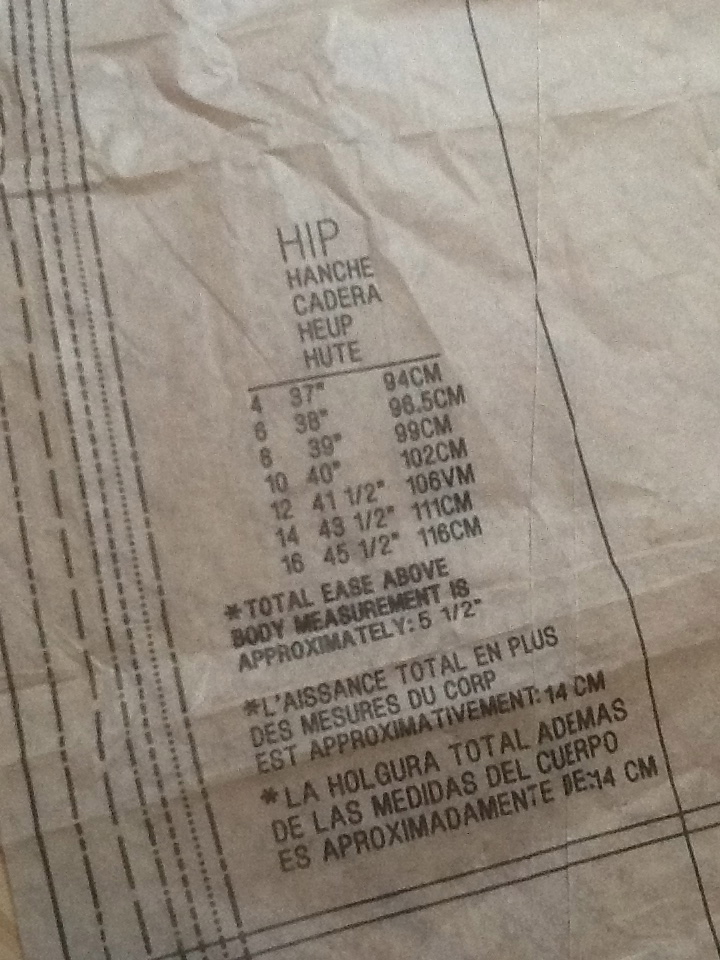
WTF is Ease? Ease is “wiggle room.” Looking at this chart that classifies as “loose fitting” so I just stuck with tracing out size 14.

I laid out the crinkly pattern pages and traced the applicable pieces onto some Swedish Tracing paper. Why? Because then I can make the length adjustments I wanted to to my pattern pieces, without cutting into the original pattern. The Swedish paper isn’t as unruly as the original pattern paper – it lays flat and it’s sturdy enough to write on without tearing. You can buy a whole roll for about $10 on amazon.
![]()
WTF are these arrowheaded lines? They are grain lines – be sure to translate them onto your Swedish paper. Here’s a great little video about lining up your fabric with the grain lines.
How do you adjust the length of a pattern? You look at these double lines and add (or subtract!) your length here. Remember to do the same amount of adjustment to EACH of your pattern pieces. I added an inch at both places – allowing myself extra length in the torso and at the bottom.

The blue sticky shows you where the length adjustment double lines are on this pattern piece.

On my tracing paper, I added the inch of length!
Once I had all of my pattern pieces translated to the Swedish tracing paper, it was time to cut into my fabric. I actually opted to make a muslin first. That means, I made a practice dress out of cheap muslin fabric. I didn’t do the facings, peplums, or the zipper, but it gave me a feel for how the final dress was going to fit.

Wrinkly, but you get the idea.
Looks good!
So now it was time to cut into my fabric FOR REALS. I had this mens’ suiting fabric that was found in my husband’s grandpa’s attic.

Royal London… Vintage? Just old?
It looked great and after sprucing it up, I dug in.
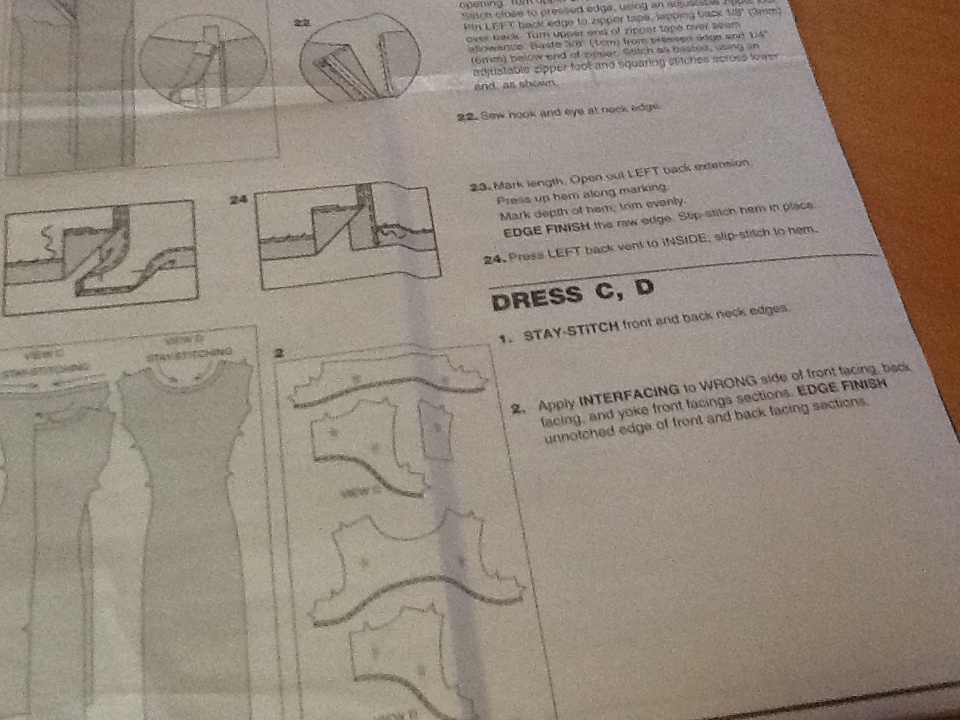
Step One… huh… what is “Stay Stitching?” It means sewing a line about 1/2″ from the raw edge that will help the piece keep it’s shape as you sew the rest of the garment.
And now Step Two… What is “Edge Finish?” I told you guys I was a beginner! It means sewing a zig-zag stitch, or an overlock stitch, or using a serger on the raw edge of the piece in order to prevent it from fraying. There was a whole lot of looking up definitions and then looking up definitions for all of the words in the definition…
As I mentioned, I opted not the make the little button tabs from View D that would sit above the peplum, so I skipped step #6 and #7.
Pay attention to Step #8 – do not sew the bodice all the way from waist to armpit. You’re leaving part of the seam unsewn so as to help when sewing the facing on later.
Skip steps 11 – 13. Those steps aren’t for your kind.

Picture is dumb. RIGHT SIDES TOGETHER
Step 14 – GRIEVANCE! You need to pin the facing to the front of the dress RIGHT SIDES TOGETHER. That’s what the words say here, but that it not how it looks in the picture. Right sides together, right sides together.
And what does it mean to LAYER SEAMS? When you sew a seam you’ll have two (or more!, but two in this case) layers of fabric in your seam allowance. The instructions are telling to to take each layer of the seam allowance and trim them a bit so that the seams lay flat. The rule of thumb (I’ve learned – through extensive googling) is “the side that faces the public” is kept widest. In our case this means, take the seam allowance layer of the facing and cut it to be about 1/4″. The bodice seam will remain 5/8″ and thus be wider. When you flip the facing to the inside, the bodice seam will be the one that “faces the public”. This is also called GRADING A SEAM.
Since this is a curve, we’ll also want to CLIP THE CURVES. That means cutting a straight line through the seam allowances, towards BUT NOT THROUGH the seam. It’ll help the fabric make a nice, flat-laying curve. Here’s a nice little explainer.
Step 15 says Baste. WHAT IS BASTING? Finally a phrase I knew! But just in case you don’t it means to sew with a really long stitch length to temporarily hold two pieces of fabric together. The basting stitch can easily be removed.
Step 16 WTF IS UNDERSTITCH? I found this Youtube clip VERY helpful! It means to sew a layer of your fabric (the facing, here) to the seam allowance. It’s done to keep the facing from spilling out of your garment while you wear it. I did most of my understitching by machine, but some of the times I did it with a needle and thread by hand.
I moved Step 18 to AFTER STEP 22. That way I could deal with sewing the back vent and attaching my zipper without wrestling with the rest of the dress.
Step 22 – I WENT ROGUE! Instead of following the instructions and doing a zipper that would be semi-hidden with a little flap, I wanted to do a trendy exposed zipper. I followed these instructions to the best of my ability. It was a bit of fake-it-till-you-make-it.

Speaking of fake it till you make it, I couldn’t make Steps 23 and 24 work as instructed. They said to sew the shoulders together here, but when I tried that everything looked bulky and I couldn’t get the seam to lay flat and straight. So instead I applied the back facing to the back at the neck and sides – not the shoulders. Once I flipped the facing to the inside and understitched, I folded the shoulder seams from the back underneath 5/8″. Pressed. Then I stuck the shoulder seams from the front inside the shoulder seams of the back (remember – I didn’t sew the shoulders shut on the back of the dress, so there’s a tube there that the front can slide into). Then I blind-stitched the seams shut, joining the front to the back. It worked for me.
Stitch up the sides as explained in step 26. I skipped the hook and eye because it didn’t work with my zipper. Then I zig-zagged the raw-edge of the hem, turned it under 5/8″ – pressed – and did a blind stitch! Here’s a nice blind-hem tutorial.
Voila! Fancy dress! This took me about 12 hours to make, including the muslin and all the googling, and the seam ripping and starting over.
The dress is great. If I saw it in a store, I’d want to buy it! Prefect for work, for a nice dinner, or a cocktail party!

Thanks for reading. If you make one of these dresses and found this walkthrough helpful – please leave a comment! I’d love to see what you made!


Great job! The dress fits you beautifully and I love the exposed zipper 🙂
Thanks, Debbie!
Nice work! What an awesome dress and it looks like you managed a great fit on it too!
Belated thanks, Kris!
Just discovered your series — love it and your dress looks great!
Thanks Jennifer! Hoping to add more Walkthroughs soon.
I love this blog it’s super helpful. These patterns are worse than trying to make sense out of a Dr’s script but you’ve put it all in lay man’s terms. Thanks!!
Thank you for ssharing this