

I needed a sharp looking skirt that would work for winter, and I turned to some handwoven fabric I received as a present and this chic Burda Style Pattern.

If you are interested in learning how to put a vent into a slim-cut dress or skirt, how to add a lining, or tips on working with handwoven fabrics, read on!
This pattern results in 7 pieces of cut fabric:
- Front Center Panel
- Front Side Panels – Right and Left
- Back Center Panels – Right and Left
- Back Side Panels – Right and Left.
The shape of this pattern is wonderful, but the instructions were a bit over my head, and also I wanted to make a couple of changes…
Adjusting the pattern:
In the directions, it will instruct you to make a back slit. This wasn’t looking nice with my woven fabric, so I opted to make a vent – the same style as in my Peplum Dress.

I pinned a side of the vent flap up so you could see how this will look…
You’ll need to make an adjustment to the pattern piece. Here are the measurements for the piece you should tape on to the existing pattern piece:

Cutting the fabric:
Now you are ready to cut out your fabric pieces. Remember – Burda Style patterns DO NOT include seam allowances, so add a 5/8″ seam allowance to all pattern pieces. (That means trace a line 5/8″ out from each outline of the pattern. Your fabric pieces will be 5/8″ larger all the way around than the outline of the pattern.)
I decided to line this skirt; if you feel like doing the same, cut out each pattern piece from muslin, adding the seam allowance. Take off the added vent piece from your 23 pattern piece when cutting out your muslin. In other words, use the original pattern piece 23 for your muslin. (We’ll be hemming the lining much shorter than the skirt, so there’s no concern about the vent).
In the instructions it says to sew the panels together first, and then add the zipper and finish the slit. I opted to do the zipper and the slit first so I wouldn’t have to deal with the other pieces getting in my way.
Being a Moron: The pattern instructions say that after you cut out the fabric pieces do this:
Interfacing: Iron the Vilene Bias Tape/ stay tape to wrong side of skirt pieces, over facing fold lines.
I don’t know what this means. Above my pay grade! But I think it’s saying to apply stay-tape to this garment. Due to the fraying/fragile nature of my hand-woven fabric, I came up with a solution I think meets this criteria, but I didn’t apply my janky stay-tape until the skirt was assembled. Read on below for more details.
Zipper and Back Vent:
For the Back Center Panels – Right and Left – I used THESE instructions for installing the zipper and THESE instructions (with my pattern addendum) for adding the vent.
Assembling the Skirt With a Lining:
Follow the pattern instructions to sew the side panels to the front panel of your skirt. You know have one complete “Skirt Front” Unit. Do the same for your muslin and now you have one complete “Lining Front” unit.
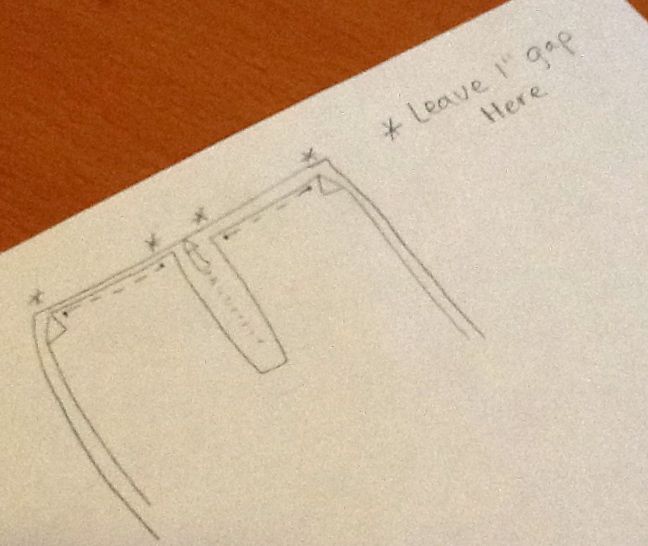
Sew the “Skirt Front” unit to the “Lining Front” unit along the waist line, right sides together, but leave a one inch gap from both edges:

Follow the pattern instructions to sew the side panels to the back panels of your skirt. You know have one complete “Skirt Back” Unit. Do the same for your muslin, except leave a gap between the Center Left and the Center Right back panels where your zipper would go. We’re going to hand-stitch that gap to the skirt’s zipper tape when all is said and done.
You now have a “Lining Back” unit.
Sew the “Skirt Back” unit to the “Lining Back” unit along the waist line, right sides together, but leave a one inch gap from both edges. and from both sides of the zipper.
Now it’s time to attach the Skirt Front to the Skirt Back. Sew the front of your skirt to the back of your skirt (scootching the lining out of the way – you’re just sewing skirt fabric to skirt fabric here), matching raw edges, right sides together, starting at the bottom hem and ending at the waist.
Take the lining layers and sew them together – front piece to back piece and sewing from the bottom to the waist. Be sure to not sew the skirt fabric here. You’re just sewing lining fabric to lining fabric.
Flip the muslin to the inside of the skirt and understitch. Then blindstitch the gaps where the lining is not joined to the skirt fabric at the waist. Blindstitch the gaps in the back between the lining and the skirt fabric on each side of the zipper. Fold raw-edges under and hand-stitch the lining slit for the zipper to the zipper tape.

Ignore marker marks on my lining. That’s just something professionals do.
Jenna’s Janky Stay-Tape:
So add support to my seams, and to try and control the fraying nature of my fabric, I created my own quasi-fusible-stay-tape. I used some single-fold bias tape (how to make your own bias tape tutorial) and some Stitch Witchery. I had both of these on hand and this would save me from going to the store. Along each of the seams of my skirt fabric (on the wrong side of the fabric) I placed a strip of Stitch Witchery (a brand of fusible ham tape), cut to length, then topped it with a layer of bias tape – unfolded and cut to length. Then I ironed the fabric-witchery-bias tape sandwich and everything fused into place! Added support for the garment – yay.

Inside out skirt with lining pulled above it’s head. Sometimes I used red bias tape, and sometimes white, because I am a candy-striper at heart.
Hemming the Skirt and the Lining:
Here’s a tutorial on doing a blind hem! I actually used my Stitch Witchery here – again – due to the fraying.
Cut the lining short enough that it is above the back-vent and won’t peak through the slit. Finish the raw edge with a zig-zag stitch, or a serger, or do a hem-stitch.

You’re done! High five!


another rockin’ piece! nice work, Jenna!
Thanks, Kris!
Hey there!
I am wondering if there is anyway to shorten a pencil skirt that has a zipper? I’m 5’2″ so pencil skirts look awkward on me. Any feedback would be greatly appreciated!
Thank you!
Hey Sara! Does the zipper go all the way to the bottom of the skirt? If not- you’re in luck! You can hack that baby to a modest (or unmodest! Go for it!) mini skirt just by cutting the skirt a little longer than your desired length and then hemming. Let me know if you need more ideas or help!