
One alternative to making traditional binding is to make a quilt-back big enough to fold over to the front of the quilt and sew in place. That’s right, you can use the backing for the binding! I’ve had a tutorial for this process up on the blog – it was one of my very first posts back in 2010! But that tutorial needed some updates – here we go!
After basting your backing fabric (with a safe 2″ excess around the perimeter of the quilt-top), batting, and the quilt top, go ahead and do the quilting. IMPORTANT NOTE #1: DO NOT QUILT PAST THE BORDER OF YOUR QUILT TOP. If you go over your quilt-top, onto overhanging batting and backing, you will have to pull out your seam ripper and pull out those stitches before being able to square-up your quilt and fold over your binding. Major annoyance – don’t do it!
Okay so once you’ve quilted your blanket, square-up your quilt-top and overhanging batting. I do this by marking my 90 degree corners directly onto my quilt-top with a water-soluble marking pen. Then you’ll cut out the rectangle shape with scissors cutting ONLY the batting and the quilt top. IMPORTANT NOTE #2: DO NOT CUT YOUR BACKING FABRIC WHILE SQUARING UP YOUR QUILT-TOP AND BATTING. You are only cutting the batting and a small portion of your quilt-top during this squaring-up process. You may find it best to fold your quilt-backing safely out of the way, under your quilt, and pin it in place.

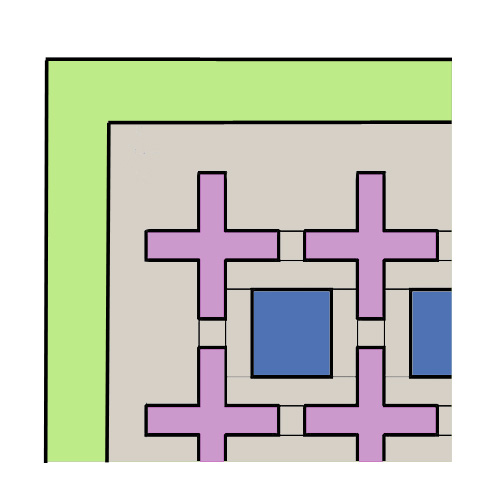
Once your quilt-top and binding are squared, use that border as a guide for squaring up your backing fabric.
- Perimeter necessary = 2 x desired width of binding
- Want 1/2″ binding? Trim the backing fabric to a 1″ perimeter.
- Want 1/4 ” binding? Trim the backing fabric to a 1/2″ perimeter.
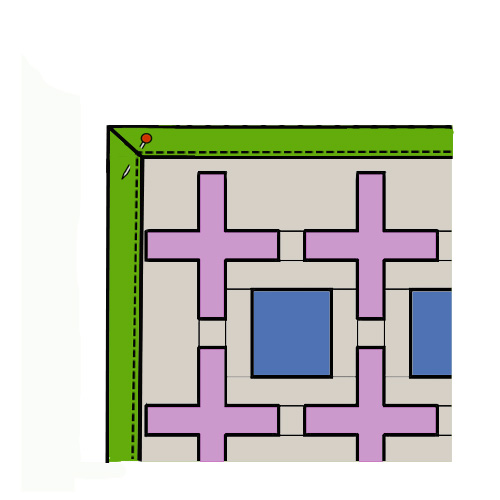
Here is a diagram where the light green is the wrong side of the backing fabric, and the grey is the quilt-top. You cannot see the batting because it is perfectly squared-up underneath the quilt-top.
Iron the backing perimeter in half and then open it back up. The dotted line below signifies the resulting crease.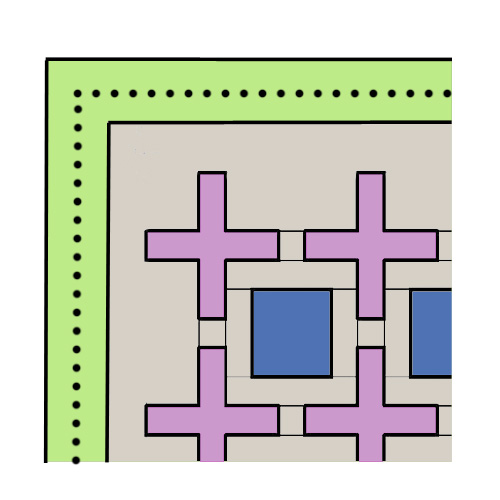
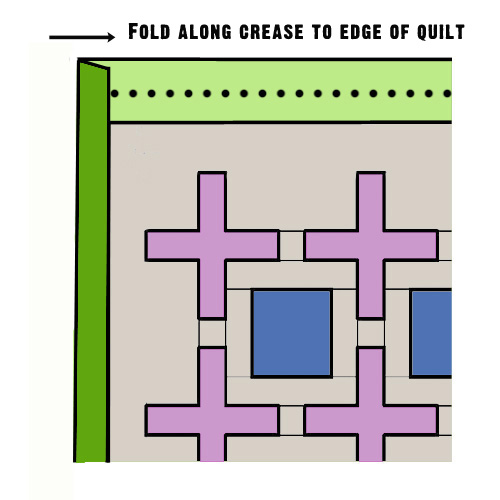
Fold one side down along the crease, so the edge touches the edge of the quilt-top:
Fold the corner over at a 45 degree angle: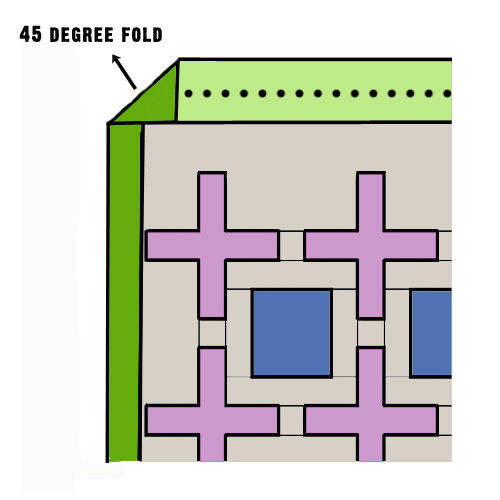
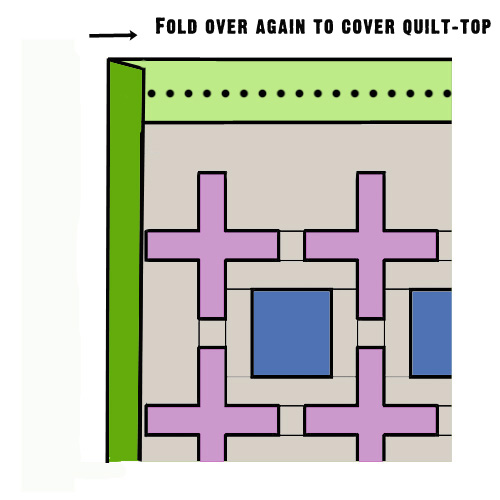
Fold the top edge of the backing down along the crease: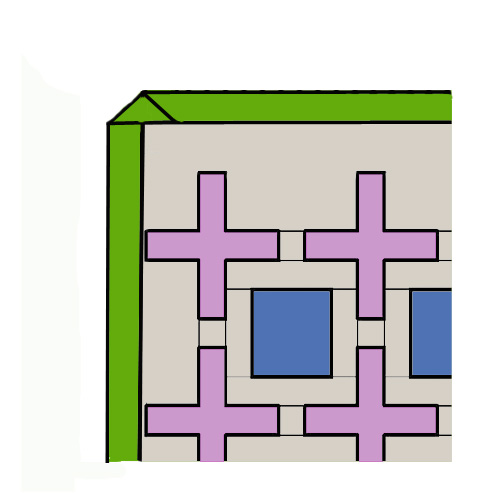
And then fold it over again so it covers the quilt-top and a perfect mitered corner is created. Use lots of pins to keep everything in place. Once you’ve done this to all the corners and pin, pin, pinned – sew along the edge of the binding at a scant 1/8″ using a straight stitch. Use a thread that matches the binding/backing fabric.


Thanks for this! I have being meaning to do back to front binding forever! But back out at the last minute! This helps a lot.
Love
NikkiM
So glad!! Thanks for the comment
I’m about to try this..great tut! Question: Where is the quilt you showcase in the header of your blog? The one with gray squares and solid crosses? I’d love to make this!
Hi Simone the quilt you looking for is on blog. http://jennabrand.com
Love
Nikki
Yup! The pattern is here! http://www.craftsy.com/project/view/positive-space-quilt/60712
Thank you sooooo much for your help!!!
Going to try it Donna T
What about all the extra fabric in the corner? Do you reduce it somehow or just have a big lump at each corner?
Cut backing fabric corner at 45 degree angle, 1/4 inch past corner of quilt top. Fold cut backing corner down exactly ro point of quilt and iron so you have a finished edge. That eliminates the bulk and still forms a perfect miter. I hope this is clear. Other steps are the same. I also use Sharon Schamber’s method of glue basting rather than pinning.
Thanks, Roberta! Great advice!
Thanks to you and Jenna both. This worked very Well!
Have used several back to front mitered binding methods, but this by far the easiest one I’ve tried and it came out perfect. Thanks so much.
This is great! I had put minkee on the back of 2 baby quilts and wanted to just fold it over but with mitered corners. Thank you for your very clear descriptions that helped a first timer accomplish the ” impossible”!!
The whole afternoon I was struggleling. I googled and find your explanation. Now my quilt is finished. Thank you so much!
I’m so happy this helped, Liane!
Thank you for these directions. I am soooo glad that I found them. I have been searching the Internet for two days for help with this. Thanks again!
I’m so happy they helped!
Hi there – I am a quilting newbie and this will probably be the most ridiculous question but how do you get rid of the raw edge once you have folded the backing fabric twice to make the binding? Do you just tuck a little bit of it under and press before sewing?
Please ignore my comment…..it just dawned on me as to where the raw edge will be. It’s been a long week lol xx
Great explanation and brilliant graphics.
Thank you so much!
This is a great tutorial. It really helped a lot I bookmarked it so I can use it again. Also sent a link to a friend of mine . I know she will appreciate it
This has been awesome. Thank you so much. I have have never been able to make a miter corner that I was proud now I have
That’s awesome! So glad it helped
This has been awesome. Thank you so much. I have never been able to make a miter corner that I was proud now I have. Thanks again.
How can I print this?
This is a great tutorial! I use a pin at the top edge of the quilt to make it easier to fold the 45º angle. Then I position the pin at the crease line for the second fold. Also found that it helps to put a little basting fabric glue under the miter to hold it in place.
Thank you, thank you, thank you!!!! I have been looking for this everywhere and your tutorial is so easy to follow I was able to make a perfect miter corner first time!
My granddaughter designed the quilt I made for her and saw the way I had pinned the backing over the front with filling untrimmed
and likes it puffy. Do you have any suggestions on how to trim and fold to make this work? Help!
Thank you so much for this! I seem to have difficulty remembering the steps so this is a perfect cheat sheet and I so appreciate it!
I was unsure how to get decent mitred corners when self-binding the advent calendars I am making. Found this site while doing a search for self binding. Such straightforward, clear diagrams! Thank you.