Category Archives: Tutorial

Improv Arrow Quilt Block Tutorial

A group within the Ann Arbor Modern Quilt Guild is working together on a charity quilt featuring improvisational arrow blocks.  Today I grabbed some scrap fabric and experimented with a piecing strategy.

For my group, these are not instructions and certainly feel free to create your arrow blocks however you’d like!  But let me offer this Improv Arrow Quilt Block Tutorial just in case it’s useful.

-1

Read more for the tutorial.

Continue reading

2 Comments

Filed under A2MQG, Pattern, Techniques, Tutorial

Folded Flock – Process

This is my technique for joining nonuniform pieces together to form a workable rectangle when making a quilt.  I want to show you how I started combining my birds and triangle blocks together to make large rectangles that could be pieced together for Folded Flock.

Here is a group of three birds and a cluster of triangle blocks that I wanted to piece together.  I already joined the dark blue and the minty colored birds, adding a strip of fabric first to the right of the blue bird so it’d be the same width as the mint.  I also added a strip of white between the two birds so they would have a bit more space to soar.

part 1

With an intention to stagger the birds and to ensure that the lower row of triangles could fit flush beneath the mint bird, I added fabric to the top of the orange bird and additional fabric to the yellow triangle set.

part 2

I joined the orange bird with the yellow triangle base to the other birds and trimmed the fabrics.

part 3

When joining these pieces, I looked for places where I could match seams.  The below aligned perfectly because I am good with the cosmos and luck is sometimes on my side.  I learned from Amanda Jean of Crazy Mom Quilts that having seams either match or decidedly NOT match (meaning 1/2″ or more “off”) is the best way to ensure an eye-pleasing quilt. part 3-1

I needed to add a bit more fabric to the bottom row of triangles, and I matched the seams so that the white and blue triangle block could align directly below the yellow and yellow block.  An additional strip of fabric was joined to the bottom.

part 4

Lots more information can be found in my original post here.

So there you go!  This quilt was designed with the intention that I would be adding light printed fabrics to my original pieces in order to join my elements together as a whole, and this is how I did that!

1 Comment

Filed under Fabric, Techniques, Tutorial

Arizona Quilt TUTORIAL and GIVEAWAY

done

I am so honored to be a part of the blog tour for April Rhodes’ upcoming fabric line “Arizona” from Art Gallery! 

done-4

I made another quilt inspired by my most recent project, Play on Point, which was inspired by this quilt Instagram’d by 2ndavestudio!  I call this one Arizona on Point.

done-3

done-2

done-1

April Rhodes is sponsoring a giveaway HERE for a FAT QUARTER BUNDLE! Just leave a comment below by Saturday May 10 and I will randomly select one winner to get a fat quarter of this fabulous line mailed to them ASAP!  United States residents only, please. 

done-giveaway

AND I HAVE A TUTORIAL!  Just click Read More at the bottom of this post.

Here’s the whole gorgeous Blog Hoppin’ Gang!:

Thursday, May 1 – Noodlehead
Saturday, May 3 – Julie Herman – @jaybirdquilts
Sunday, May 4 – Erin Sobon Sundet – @sewbon
Monday, May 5 – Jenna Brand – @howtobejenna
Tuesday, May 6 – Kelli Ward – @truebias
Wednesday, May 7 – Rachel Howard – @familyeverafter
Thursday, May 8 – Delia Randall – @deliacreates
Friday, May 9 – Kelly Costas – @cutcutsew
Saturday, May 10 – Rachel Gander – @imaginegnats
Sunday, May 11 – Devon Iott – @missmake
Monday, May 12 – Mary Dugan – @marysdugan
Tuesday, May 13 – Shannon Cook – @soveryshannon
Wednesday, May 14 – Penny Layman – @sewtakeahike
Thursday, May 15 – Katie Blakesley – @swimbikequilt

done-5

Continue reading

129 Comments

Filed under Fabric, Pattern, Quilting, Tutorial

Tubular Bandana Buff Tutorial

IMG_1820

Where it around your neck!

Yay for Spring!  I actually like yardwork and gardening quite a bit and nothing helps keeping hair out of your face, bugs of your neck, the sun from burning your ears, or sweat dripping everywhere like the perfect bandana!

IMG_1822

Gardening style- keeps hair up and ears covered.

It’s totally TUBULAR like they wear on Survivor.

IMG_1826

Stoner beanie! Or bold fashion turban! Or crazy bag lady!

The most popular brand of these is BUFF brand.  They are seamless tubes so they must loom their own tube-tastic fabrics or something.

IMG_1828

Apocalyptic home improvement expert!

But you can make one with simple jersey at home on a basic sewing machine!  Let’s make ours with a sort-of-kind-of-flat felled seam / french seam.  Read on for the tute.

IMG_1829

Girl with the pearl earring!

Continue reading

7 Comments

Filed under Clothes, Pattern, Techniques, Tutorial

Woodlands in Winter Quilt and Tutorial

Here is a quilt I made for my mother for Christmas!  I call it Woodlands in Winter.  They live in the forest and run the Woodlands Sawmill.

tree-1

Improv trees on a sea of mixed neutrals.  I was inspired by Lovely Design’s Lovely Little Forest quilt from the Purl Bee.

tree-2

Walking foot quilting in flowing lines, inspired by Debbie’s Joy of Simplicity pillow seen here.

tree-3 I bought a white-on-white bundle from Pink Castle Fabrics and used a lot of Kona Bone for the background.   It measures something like 80″ x 75″.

fell-downOne tree fell down.  Time to harvest its lumber!

Read on for a tutorial on how to make these wonky trees and plan for the final layout…

Continue reading

8 Comments

Filed under Fabric, Holiday, Pattern, Quilting, Tutorial

Echino Kimono

After seeing the awesome, simple tutorial on Elle Apparel, I knew I had to make a “kimono.”

rhino2

Rather than silk, however, I was dying to use the Echino Rhino print.  It’s a 85% cotton/15% linen blend, but I like the way it hangs, especially after a wash.  The design is so awesome, I literally felt the need to drape myself in the fabric.

Screen Shot 2013-10-03 at 3.06.21 PM

This has been a great way to add a touch of fashion to my tees and jeans wardrobe.

rhino1


1 Comment

Filed under Clothes, Fabric, Tutorial

Trapezoids in Space – a finished quilt

I’ve been trying to come up with a quilt utilizing some of the Constellations fabric line (by Lizzy House – available here), and these glorious “Grumpy Moon” screen prints made by my friend and fellow Ann Arbor Modern Quilt Guild member Amy!

moon1

This design is the same concept as my “Trapezoids at Work” quilt and I even have a tutorial posted over HERE.

moon2

Thanks, AMY! For these stunning moons!  Perfect for a grumpy toddler…


moon3

This quilt will soon make it’s home in Wisconsin with my sister’s family.  We’re all eagerly awaiting the birth of my first nephew!

1 Comment

Filed under A2MQG, Fabric, Quilting, Supplies, Tutorial

Pants to Skirt and Blind-Hem Tutorial

Do you have a whole bunch of ill-fitting clothes still taking up space in your closet?  Once again I found myself reluctant to give away a pair of pants: they were from The Limited, bought in 2007, 2 sizes too small, but in great shape and buttery soft.

And, as I mentioned in my last shorts-to-skirt tutorial, I really need the warm-weather bottoms! I decided to use more of that stretch sparkle denim for my side panels.  But this time I used the reverse side of the fabric which is a bit more gold than blue.  Saucy!

SONP-2I followed the same procedure as last time for making this skirt.  The only difference was that this time I did a blind-hem stitch on my machine!

I think I tried to do a blind-hem on my machine once before, but I decided to take this opportunity to really learn this skill. If you’re new to the process as well, here’s a tutorial on how to sew a blind hem by machine!  Read on…

Continue reading

Leave a comment

Filed under Clothes, Supplies, Techniques, Tutorial

Jorna Hack – Stretch Lace Jorna

jenna-5

So now that everyone has their Jorna pattern (right???) here’s a simple modification you can make to get a beautiful Jorna out of any transparent fabric with stretch.


lacehem

I have this stretch lace and I LOVE IT.  But obviously I couldn’t do the normal lining that is called for in the Jorna pattern, what with the see-through-ocity of the lace.

jorna-4

My secret to pretty finished edges when using lace or similar fabric?: WONDER TAPE.  Hallelujah sing the praises. This is a skinny double-sided tape that disintegrates in the wash (or whenever it’s exposed to water).

laceneck

So to make the dress (or tank – whichever length), first sew together the shoulders as instructed, but then skip ahead to sewing the sides together from hem to armpit.  For this type of fabric, I will finish these seams on the inside with an overlock stitch and trim off any excess.  A serger would be handy here.  Or you could do French seams!  Ohh la la!

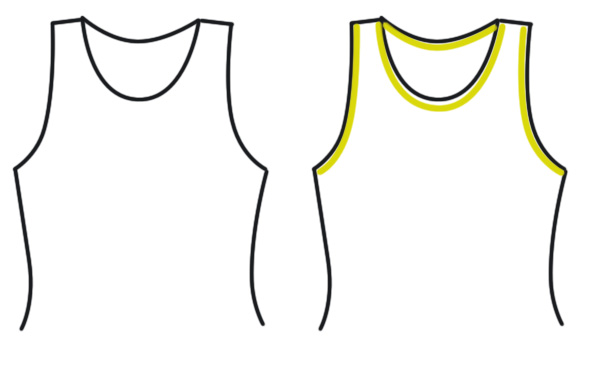
Now you just need to finish the armholes, neckhole, and bottom hem.  Start by sticking a long strip of Wondertape along the neck-line’s raw edge, onto the wrong side of the garment.  Remove the backing of the tape, and fold it down!  It sticks! And now you can sew over the tape (on the right-side of the garment) with a narrow stretch stitch.  It’s easy peasy sewing through the tape – no gunky needles in my experience.  Repeat the process for the armholes and the hem.   You could fold the edge over twice to encapsulate the raw edge completely.  You could.  I don’t.

lacejorna

Where there’s yellow – you must WONDERTAPE

I actually use WonderTape when hemming the Jorna in this YOUTUBE VIDEO of me sewing a Jorna in less than 40 minutes (fastforwarded through genius editing technology so the video is just 4 minutes long).

Okay – and for the slip (because otherwise this would actually make for some fierce lingerie, but I need to be able to wear it on the streets) I made a black tube out of jersey, added straps, and called it good enough.

I’m linking up to the No Pants Summer 2013 party!


2 Comments

Filed under Clothes, Supplies, Tutorial

Shorts to Skirt Tutorial

shortsbuttonI’ve done this before, but here we go again!  Here’s a tutorial on how to turn those too-tight shorts into a skirt!  We can easily make a nice pencil skirt out of shorts, and even give it a bit of an A-Line with the help of some side-panels.

I’ve gained my share of inches around the hips in the past 5 years.  I blame babies, beer, and the general annoyance of aging.  So I’ve got lots of shorts laying around, but not enough that fit.  Now that is officially the temperature of molten lava, time to increase my warm-weather wardrobe!

Read on for a full tutorial…

Continue reading

Leave a comment

Filed under Clothes, Tutorial