Category Archives: Fabric

Trapezoids in Space – a finished quilt

I’ve been trying to come up with a quilt utilizing some of the Constellations fabric line (by Lizzy House – available here), and these glorious “Grumpy Moon” screen prints made by my friend and fellow Ann Arbor Modern Quilt Guild member Amy!

moon1

This design is the same concept as my “Trapezoids at Work” quilt and I even have a tutorial posted over HERE.

moon2

Thanks, AMY! For these stunning moons!  Perfect for a grumpy toddler…


moon3

This quilt will soon make it’s home in Wisconsin with my sister’s family.  We’re all eagerly awaiting the birth of my first nephew!

1 Comment

Filed under A2MQG, Fabric, Quilting, Supplies, Tutorial

Madrona Road Challenge: Gear and Spark

IMG_1088  The Ann Arbor Modern Quilt Guild is participating in the Michael Miller Madrona Road Challenge.  Participants made complete quilts with a perimeter of at least 120″, using fabrics from the Madrona Road line by Violet Craft, and complementing them with Michael Miller Cotton Couture Solids.

IMG_1090

Here’s my entry!  A bias-tape, machine-appliquéd design representing a gentle, loopy gear:

IMG_1091

The quilting represents the spark with free-motion star shapes.

It all started off with this doodle:

IMG_0709I used a bias-tape applique method.

Check out the rest of the amazing entries from the A2MQG HERE.

6 Comments

Filed under A2MQG, Challenges, Fabric, Quilting

Ugly Skirt

ugly1

They said, “What are you thinking??”  They said, “What’s this from – a muumuu?” and I said, “I know- this fabric is ugly… but I love it.”

Like the suiting fabric from my Peplum Dress, this material was found in my husband’s grandfather’s attic.  I think it’s like FROM the 70s.  It’s a cotton, as far as I can tell.  And man – it’s brilliant.  The gold leafing actually has a bit of shine to it… amazing.

IMG_0877

I used this tutorial from The Big Oak Tree as a launching point (I ended up cutting the rectangular pieces into A-line shapes, and I didn’t make a bow).

ugly2

3 Comments

Filed under Clothes, Fabric

Laurel in Red

Coletterie has launched a new pattern called The Laurel and is having a contest!  And it just so happens that this contest is happening at the same time as Made By Rae’s Spring Top Sew-Along showcase/contest!  So I had double inspiration to make a couple of tops.

Image

Here’s my first Laurel blouse!  I made it with some red polka-dot fabric that was handed over to me from a friend.  I think it’s rayon?  It goes swish-swish when you rub it against itself, it doesn’t wrinkle, it pretty transparent, doesn’t fray, and it holds its shape.

Image

Adjustments to the pattern included dropping the armhole down an inch, reducing the shoulder ease, adding about three inches to the waist and another to the hem (!! am I really that stretched out!?!?) and I moved the back darts down an inch.

Also – instead of bias tape binding for the raw edges, I did piping!!!!!  I am so happy with this choice.  I think the edges look super sharp and it was SO EASY (especially since I just used ready-made piping binding from the store).

STS-2013-sidebar-button-FINAL-@-200

Yay new blouse! Clap clap.

2 Comments

Filed under Challenges, Clothes, Fabric, Techniques

Trapezoids at Work – Finished Quilt!

Trapezoids at work!  Quilted and bound…

traps-done1

I did a tutorial for this quilt when I finished piecing the top.  It can be found HERE.

traps-done3

I wanted the “columns” of trapezoids to alternate between Business Fabric (texty prints, grids, organized dot prints, a lot of Architextures) and neutral solids, with a couple of color splashes for fun.

traps-done2

The inspiration was how my mind floats around while I work.  There are periods of focus and periods of distraction, dreaming, spacing-out…  You know how it goes!

close-1

I carried that idea into the quilting.  Dense linear quilting for the WORK areas, and floaty circular quilting for the dreaming spaces.

close-3

A couple of rings of pebbles as a nod to the pearl bracelets fabric that makes an appearance in this quilt…

close-2

Happy little dreamy scallops…

The backing fabric is a 108″ wide Spot On Wide Circle in Steel.  Pink castle fabrics has a bunch of different colors from this line – very handy!

DSC_0001

The binding is Paper Clips in Gray from the Type line…

DSC_0002

traps-done4-sqaure

I hope ya’ll like it!  I love it when a plan comes together – this is really exactly how I wanted this guy to look and everything turned out!  Happy claps!!

14 Comments

Filed under Fabric, Quilting

Trapezoids at Work – Quilt Top and Tutorial

traps-1

After seeing THIS IMAGE float around pinterest ( “Trapezoid Love” by Melanie Mikecz), I knew I wanted to do a wonky tumbler quilt.  And, like the inspiration piece, I wanted my points to match.  Wow… how was I going to make a liberated trapezoid quilt (no meticulous calculating and template-making), and still get the points to match?

traps-3

It took a couple of unsuccessful trial runs before coming up with this method.  It’s not for everyone – at the end, you’ve got the entire quilt-top in your lap and you’re completing seams and wrestling and it’s a bit gnarly.  But I LOVE the final product.  I see more of these in my future…

traps-2

I’ll chat a bit more about this quilt when I finish quilting it and binding it, but for now – a full tutorial!  I have no idea if the below will make any sense, but I tried my best and… you know… it’s free for you to read.

traezoidsatwork copy

Continue reading

4 Comments

Filed under Fabric, Inspiration, Pattern, Techniques, Tutorial

I made a Tova!

I made a Tova!  tovasquare

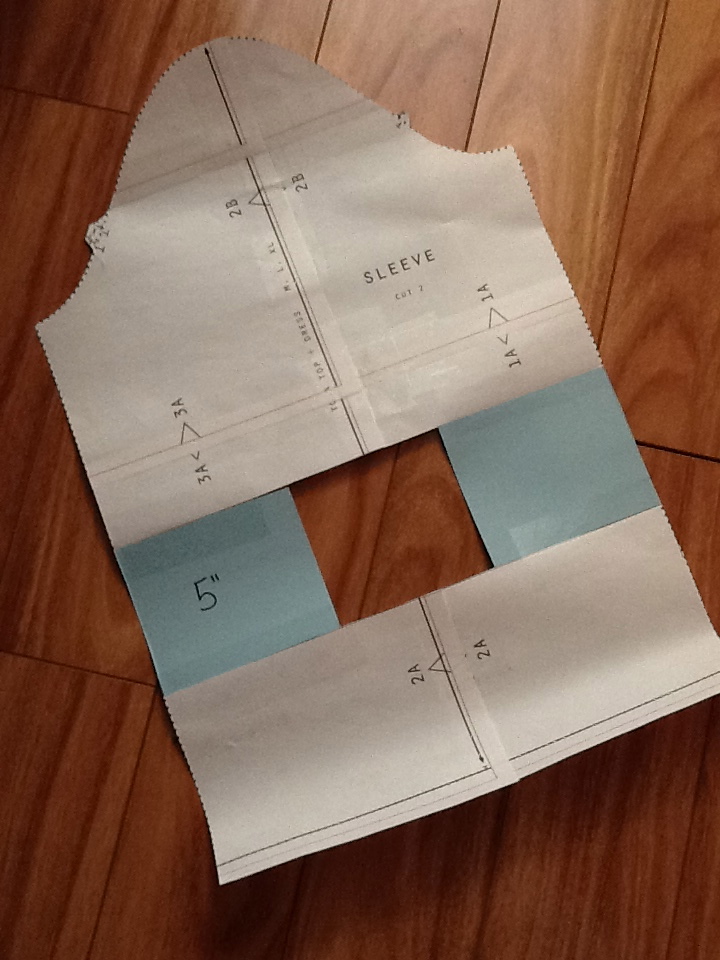
I would do a pattern walk-through, but really the only adjustment I made was adding a bit of length to the sleeves (5 inches to made them full-length for my monkey arms rather than 3/4 length) and to the torso (one inch longer than the largest size hem line).

IMG_0735

Sleeve pattern piece with my length adjustment.

The pattern isn’t necessarily tricky, but I found VeryKerryBerry’s Tova Sew-A-Long blog posts IMMENSELY helpful.   And like Kerry, I lined the bodice panel – baste stitch your lining fabric to your Tova fabric wrong sides together first thing, and then proceed as normal!   I did this because I’ve seen that the Tova collar kind of flops open adorably, and I found the idea of having some “peekaboo” fabric inside appealing for everyone who chooses to stare down my shirt.

tova3

Read the note at the bottom about why I have my iPad in my lap here…

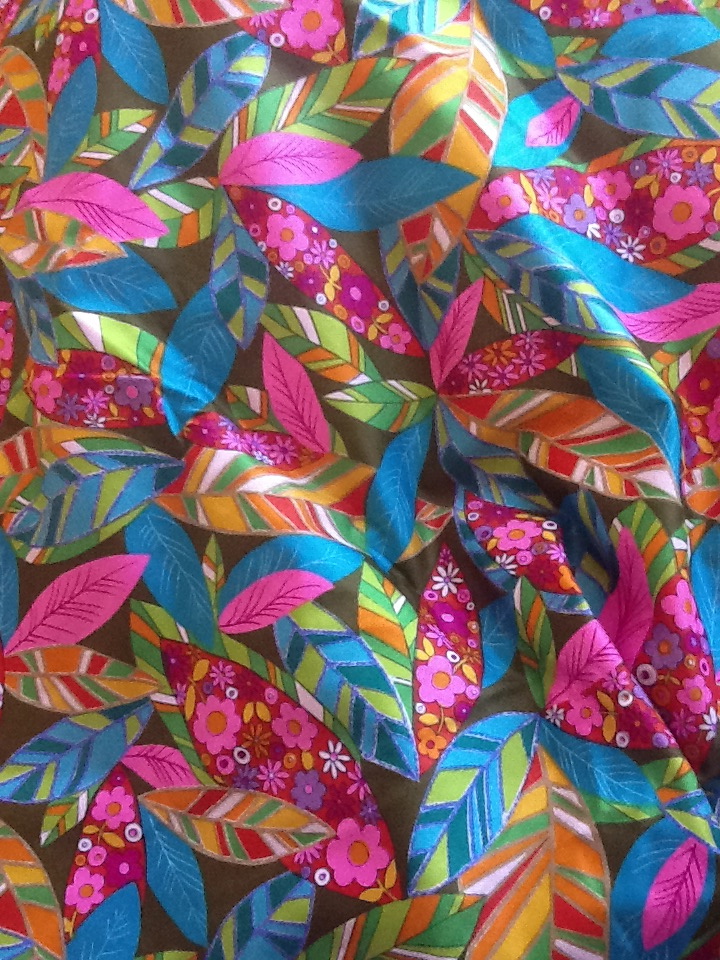
My shirt is made from Mixed Signals Voile in Striking, which I got from Pink Castle Fabrics.

I did my best to line up my pattern pieces smartly so that the vertical lines of this fabric aligned nicely in the finished product.  I was pretty successful!

tova2

This was my first time sewing with Voile, and it was wonderful!  I used my walking foot while sewing and didn’t experience any trouble.

Okay – a little note about why I have my iPad in my lap in that picture… My husband got me the coolest little gadget for my birthday!  It’s a Nikon WU-1a Wireless Mobile Adapter (they don’t sponsor, obvs – I’m small ‘taters).  I plug the little square into the side of my camera, and it creates a wifi network that I can join on my iPad.  Then I can open the app on my iPad and see through my camera THROUGH MAGIC through my iPad!!!  And then I can take the picture by clicking the button on my iPad!!!  So cool.   UPDATED TO ADD:  Also, the dealy automatically sends the pictures on my camera onto my iPad/PhotoStream – no more chords for getting the photos onto a computer! Here’s a youtube review.

9 Comments

Filed under Clothes, Fabric, Pattern

Archicoop! Finished Quilt

archicoopI finished my quilt!

coopfront1

coopfront2

I quilted diagonal lines about 2.5″ apart to convey chicken-wire for my little coop.  The quilt-front is exclusively made out all the fabrics from Architextures by Carolyn Friedlander.

For more information about the piecing of the quilt top – check out this previous post.

coopback

The backing fabric features the cross-hatched black and white print from Summersville by Lucie Summers for Moda.   The quilt is bounded in a solid royal-blue fabric, hand-stitched.

Each block finishes to 7.5″ square.  The quilt is about 53″ x 60″ – big enough to wrap around my shoulders.

And that’s just what I’m going to do with this quilt!  Wrap up in it every day.  I work from home early early early in the morning, but cuddling with this quilt in my office will make it all not seem so bad.

nametag

Fun little label.

2 Comments

Filed under Fabric, Quilting

Pattern Walkthrough – BurdaStyle Princess Seam Pencil Skirt

skirt1

I needed a sharp looking skirt that would work for winter, and I turned to some handwoven fabric I received as a present and this chic Burda Style Pattern.

Screen Shot 2013-02-20 at 3.35.02 PM

If you are interested in learning how to put a vent into a slim-cut dress or skirt, how to add a lining, or tips on working with handwoven fabrics, read on!

Continue reading

4 Comments

Filed under Clothes, Fabric, Pattern, Techniques

Archicoop! Quilt Top

Architextures by Carolyn Friedlander is the first line of fabric where I needed every.single.piece.  So wasn’t I a lucky duck to get a 1/2 yard bundle of the entire line for Christmas?! (Thanks, hubs!)

eggtop

The colors shout “Spring!” and ever since I saw Rossie’s Pebble Quilt, I’ve been hankering to make an egg blanket.

The pattern on this fabric is so geometric and linear, could it work for this design?  I needed to do a Photoshop mock-up!  (Check out this STUPID EASY tutorial for how to make something like this – I was shocked at the ease!)

archicoop

I looked good to me, so I went ahead and started making my egg blocks using Rossie’s Applique tutorial.  If you’ve seen the Famous Porthole Quilt by Lucie Summers I think this is the method!

eggtop2

I verged from Rossie’s tutorial in a couple of places.  For one, I didn’t trim the seam allowances before flipping the facing to the back.  I found that the facing would flip easier if I had more fabric to convince it to go with the flow.  And instead of top-stitching the layers together, I opted to pull out my fabric glue stick and do the Six Minute Circle method.    Just a couple dabs of water-soluble glue on the flipped fabric and stick it to your egg.  Then you sew along the same line from when you sewed your flipping fabric into place.  Essentially, you are sewing the seam allowance from the foreground piece to the egg background piece.  Go slow.  You can do it.

eggtopclose

No top-stitching! No hand-sewing!

After I sewed my facing to the egg fabric, I clipped the seam allowances.

eggtop3

Pretty quilt top!  Ready for backing and batting and basting and quilting and binding.

2 Comments

Filed under Fabric, Inspiration, Techniques, Tutorial