Category Archives: Pattern

Trapezoids at Work – Quilt Top and Tutorial

traps-1

After seeing THIS IMAGE float around pinterest ( “Trapezoid Love” by Melanie Mikecz), I knew I wanted to do a wonky tumbler quilt.  And, like the inspiration piece, I wanted my points to match.  Wow… how was I going to make a liberated trapezoid quilt (no meticulous calculating and template-making), and still get the points to match?

traps-3

It took a couple of unsuccessful trial runs before coming up with this method.  It’s not for everyone – at the end, you’ve got the entire quilt-top in your lap and you’re completing seams and wrestling and it’s a bit gnarly.  But I LOVE the final product.  I see more of these in my future…

traps-2

I’ll chat a bit more about this quilt when I finish quilting it and binding it, but for now – a full tutorial!  I have no idea if the below will make any sense, but I tried my best and… you know… it’s free for you to read.

traezoidsatwork copy

Continue reading

4 Comments

Filed under Fabric, Inspiration, Pattern, Techniques, Tutorial

Pattern Walkthrough – Vogue 8615 in Jersey

After seeing this post, I knew that once I felt I had a handle on garment sewing, I wanted to try to replicate this look: Vogue V8615 Very Easy in a jersey.

veasysquare

IMG_0736

I cannot emphasize enough googling the name of the pattern before proceeding to sew a garment.  Find all the blog posts you can and read up on the desired alterations.  After reading though a bunch of posts I knew I was going to…

  • Alter the neckline so it wasn’t such a dramatic boat-neck. (I didn’t want my bra straps peeking out).
  • Cut the front bodice piece on the fold of the fabric so it didn’t have a center-seam.
  • Not do a zipper (the jersey would allow me to stretch the dress over my head).
  • Lengthen the torso and the sleeves
  • Adjust the ease on the shoulders.
  • Adjust the sleeve pattern to avoid the elbow dart.
  • Use stay tape on the neckline, skirt hem, and sleeve hems.
  • Only line the bodice – not the sleeves or the skirt.
  • Not do pockets.

Read on for tips on pursuing each of these alterations and for a general walk-though on the pattern!

Continue reading

11 Comments

Filed under Clothes, Pattern, Techniques

I made a Tova!

I made a Tova!  tovasquare

I would do a pattern walk-through, but really the only adjustment I made was adding a bit of length to the sleeves (5 inches to made them full-length for my monkey arms rather than 3/4 length) and to the torso (one inch longer than the largest size hem line).

IMG_0735

Sleeve pattern piece with my length adjustment.

The pattern isn’t necessarily tricky, but I found VeryKerryBerry’s Tova Sew-A-Long blog posts IMMENSELY helpful.   And like Kerry, I lined the bodice panel – baste stitch your lining fabric to your Tova fabric wrong sides together first thing, and then proceed as normal!   I did this because I’ve seen that the Tova collar kind of flops open adorably, and I found the idea of having some “peekaboo” fabric inside appealing for everyone who chooses to stare down my shirt.

tova3

Read the note at the bottom about why I have my iPad in my lap here…

My shirt is made from Mixed Signals Voile in Striking, which I got from Pink Castle Fabrics.

I did my best to line up my pattern pieces smartly so that the vertical lines of this fabric aligned nicely in the finished product.  I was pretty successful!

tova2

This was my first time sewing with Voile, and it was wonderful!  I used my walking foot while sewing and didn’t experience any trouble.

Okay – a little note about why I have my iPad in my lap in that picture… My husband got me the coolest little gadget for my birthday!  It’s a Nikon WU-1a Wireless Mobile Adapter (they don’t sponsor, obvs – I’m small ‘taters).  I plug the little square into the side of my camera, and it creates a wifi network that I can join on my iPad.  Then I can open the app on my iPad and see through my camera THROUGH MAGIC through my iPad!!!  And then I can take the picture by clicking the button on my iPad!!!  So cool.   UPDATED TO ADD:  Also, the dealy automatically sends the pictures on my camera onto my iPad/PhotoStream – no more chords for getting the photos onto a computer! Here’s a youtube review.

9 Comments

Filed under Clothes, Fabric, Pattern

Pattern Walkthrough – BurdaStyle Princess Seam Pencil Skirt

skirt1

I needed a sharp looking skirt that would work for winter, and I turned to some handwoven fabric I received as a present and this chic Burda Style Pattern.

Screen Shot 2013-02-20 at 3.35.02 PM

If you are interested in learning how to put a vent into a slim-cut dress or skirt, how to add a lining, or tips on working with handwoven fabrics, read on!

Continue reading

4 Comments

Filed under Clothes, Fabric, Pattern, Techniques

She did it again…

Here’s ANOTHER Positive Space quilt!  I COULDN’T RESIST.

This one is actually smaller than any of the sizes featured in the pattern.   I really wanted to use Moda Crossweaves for the squares, but there aren’t that many in the line!  I used every option I could get my hands on and still had to fake two squares with imposter fabrics in order to have 16 blocks.

The orange in the upper right is actually this random cotton cheese-cloth type fabric I had laying around that I layered over a different solid orange.  The blue beneath it is a quilting cotton blender pattern that has the look of denim, but works as a fake-crossweave here.

A little visual interest, adding some of the backing white fabric to the front.

I love the binding – transitioning plum to maroon to red.   The thicker binding has a nice framing effect.

This quilt is being submitted into the Negative space category for QuiltCon.  I’m not sure if that’s the perfect category, but it seemed like an bit of a kismet option, considering this pattern’s name.

1 Comment

Filed under Pattern, Quilting

Positive Space QAL – Finishing the Quilt

Wow! You did it!  : )

The pattern sets you free here, leaving you to piece the backing and binding with fabrics of your choice.

Here’s the back of my quilt!  I wanted it to stay masculine so I used these fun strips.  I also knew it’d do a nice job of complimenting my white-straight-line quilting.

If you are new to quilt-basting, let me please refer you to these great, free tutorials:

• Spray and Pin-Basting Tutorial from That Girl, That Quilt:

http://www.thatgirlthatquilt.com/2010/12/basting-tutorial.html

• Pin Basting from Red Pepper Quilts:

http://www.redpepperquilts.com/2009/06/basting-and-batting.html

• Spray Basting from Film in the Fridge:

spray adhesive for quilt basting – a quick how to


I absolutely love spray basting.  I will never, ever go back to pin basting as I have had much better results with this method – not to mention that it is QUICK.    Here’s my quilt all laid out, happily basted on my living room floor.

Think you can’t quilt this on your home machine?  I say hogwash!  For this quilt, you can get a great look by doing simple straight-line quilting.  Here’s what I did:

I carried these lines all the way to the edge of the quilt.  In fact – the only places I marked the quilt-top were in the outside borders, making sure my lines stayed straight.  Other than that, I just used the corners of my pieced squares as guides as I sewed!

Looking at the above diagram, I first sewed the red diagonal lines.  I rolled up my quilt (it’s a Queen-size) from opposite corners so that the middle of the quilt (on a diagonal) was what was left exposed.  I like to start in the middle to tackle the most difficult part first.  Once I get the absolute centers of the quilt done, I know that the bulk in the neck of my machine will just get smaller as I go.  So I do my center “Red” line, and then head to the outside.  I flip the quilt around and do the next center-most “Red” line and head out to the other side.  Then I flip the quilt, re-roll, and do the same method for the “Blue” lines.  Then I re-roll and do the “Green” lines, starting in the center and working to one side, then flipping it around and going from the center to the other side.  I re-roll and do the “Orange” lines doing the same center-out process.  Then I have a glass of wine!

So here’s my quilt!  All quilted!  All square!  It just needs binding.  I’m going to use this fabric – snazzy!

If you are new to binding a quilt, let me please refer you to his great tutorial:

http://crazymomquilts.blogspot.com/2008/10/binding-tutorial.html

or this one!

http://www.redpepperquilts.com/2009/11/binding-tutorial.html
You’ll have to excuse me for not having a finished, binded quilt picture to show you.  I have other deadlines I need to pursue!  But thank you all SO MUCH for following along, regardless of when you’ve found these blog posts.

Please post pictures to the flickr group – or link to your blog in the comments – so I can OOO and AHHH over your beautiful projects!
All the best!

2 Comments

Filed under Pattern, Quilt Along, Quilting

Positive Space QAL – Finishing the Top!

Choo Choo!  All Aboard!  It’s Finishing the Quilt Top Time! (When I’m excited I capitalize words randomly, like a German!).

The pattern will give you the measurements needed for your border pieces.  But before we attach our border – we first must join our Columns!

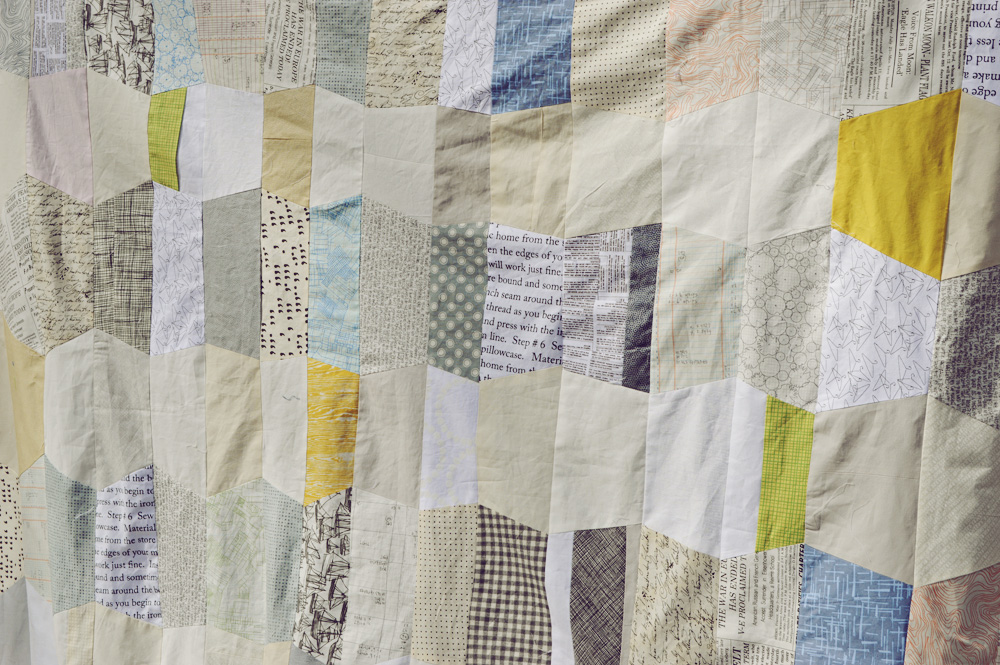
Just a sampling of our lovely column pieces!

I know that these Columns are rather long, but don’t be intimidated.  You can easily join these together to create a fabulous quilt-top!

My preference is to join all of the Column B units to the side of each of the Column A units.  When you’re doing this, remember that the center of the little square in the Column B pieces should line up with the center of the big square in the Column As.   If you’re confident in your abilities – you won’t even have to pin these pieces together!  However, if your confidence is delusional – go ahead and pin.

If you’re NOT pinning, I find it easiest to have the bottom layer of the pieces I’m sewing together curled up in my lap (gravity is your enemy!), and the top layer slung over my shoulder.  Go slow.

Once you’ve joined your Column Bs to your As, it’s time to join these A-B units to the other A-B units.

When joining an A-B unit to another A-B unit, the goal is that the horizontal bar units will line-up. Keep an eye on things while you’re pinning or sewing that everything keeps lined-up.

Soon you’ll have a big slab of A-B-A-B-A-B etc!  All that will be left is sewing your last B piece to the remaining A side, and then book-ending the top with your Column Cs.

Wait – and then all that will REALLY be left is adding your border : )

It’s my preference to just start joining my border strips to the quilt-top, one side at a time.  I stop when I’m approaching the end of a strip – sew more border strip to the piece – then continue bordering my quilt.

I border the opposite sides of the quilt first, then press those seams and do the last two remaining sides (like a giant Court House Step block!).

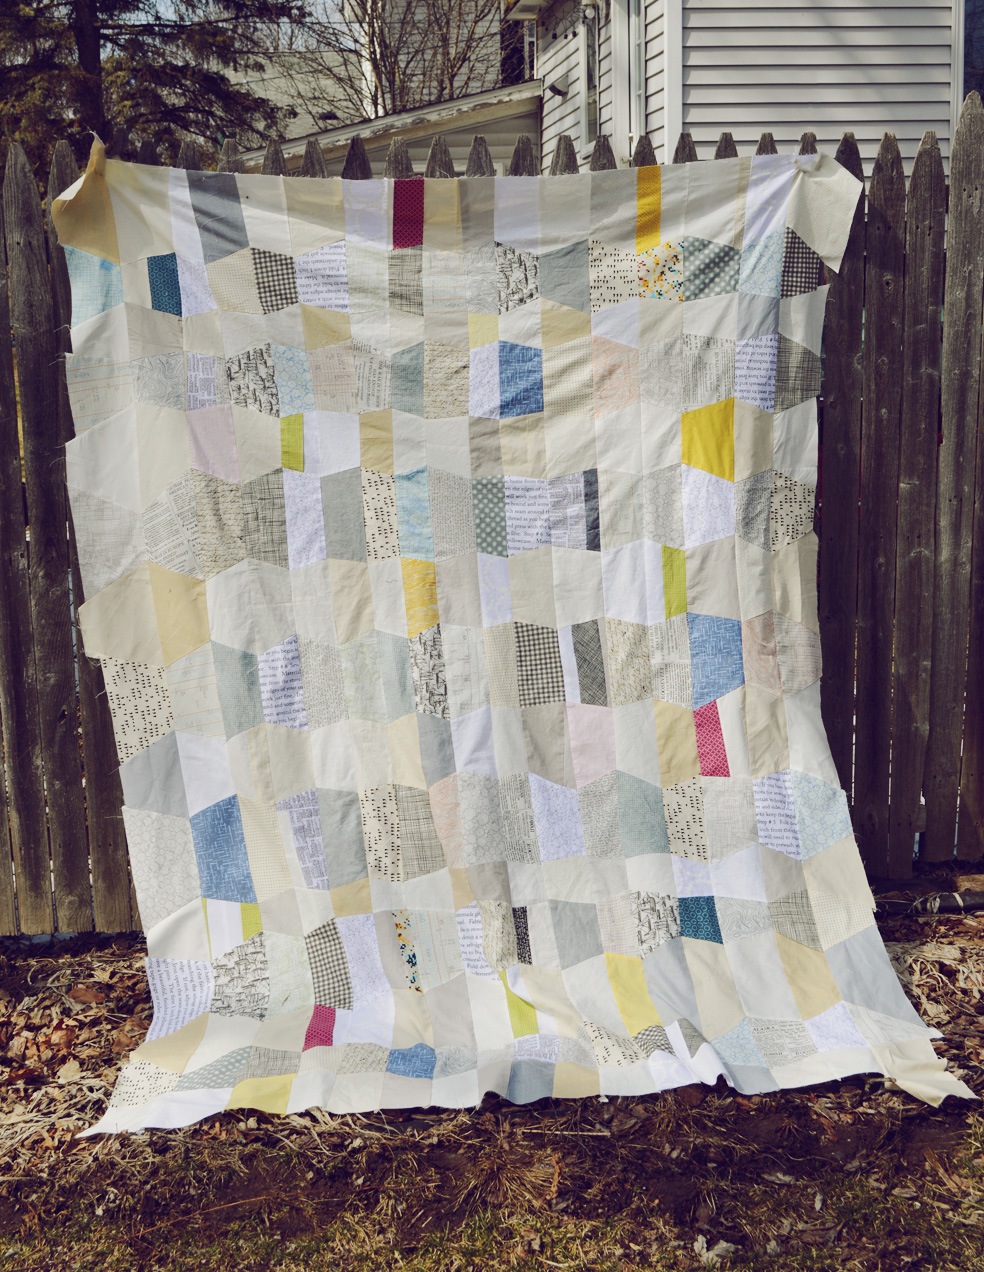
Isn’t is beautiful?  Good work, you!

Please post pictures to the flickr group – or link to your blog in the comments – so I can OOO and AHHH over your beautiful projects!
All the best!

Leave a comment

Filed under Pattern, Quilt Along, Quilting

Positive Space QAL – Column Cs

Okey doke – It’s Column C time.  This is no big deal – we only need two of these!

The pattern will give you the measurements needed for the strips you’ll have to sew together to make you rectangles, from which you’ll slice your 3.5″ x 8″ units.   It’s the same method you’ve used for Column B and the Horizontal Bar units from Column A – Make a big rectangle from sewing together some strips, and then slice that rectangle into your pieces!

Once you have your “Outside Bar Units” – you’ll sew a bunch of them together to make your two Column Cs.   You can so this super quickly by chain-sewing.  Let me show you:

Sewing together some Outside Bar Units.

After sewing the background fabric to the other piece’s plus fabric, slide the plus fabric end toward you right-side-up.

Put your next Outside Bar Unit on top of the previous piece. Right sides together! Background fabric end touching Plus fabric end.

You could use a pin, but you don’t have to! Just pinch the pieces in place and slide them under your presser foot. Whhrrrrr. You don’t have to ever stop sewing to clip threads!

When you’ve sewn all of your Column C Pieces together, you’ll have a funny little bunting to slide out from your machine!

Snip the threads all in one go, press, make sure you add your little end caps, and you’ll have a Column C unit in no time!  Make two of ’em and you’re set.

Please post pictures to the flickr group – or link to your blog in the comments – so I can OOO and AHHH over your beautiful projects!
All the best!

Leave a comment

Filed under Pattern, Quilt Along, Quilting

Positive Space QAL – Making Column Bs

We’re trucking right along!  Making the Column As was a huge step.  The As gave us the horizontal bars for our plus-signs, but now we need the vertical bars! Column Bs come together MUCH faster using convenient strip piecing!

The pattern will give you the measurements needed for these strips, and tell you how many columns you’ll need to make depending on the size of your finished quilt.  I’m working on a Queen Sized blanket, so the pictures here reflect that assembly.

You’ll sew these strips together, alternating between plus fabric and background fabric.

Queen-Sized Instructions.

Then you slicey slice!

Vertical Bar Units! (Queen)

To a couple of these pieces you’ll add the end-cap pieces.  Then sewing together a couple of these skinny strips, you’ll get the Column B pieces!  Ta Da!  I like to press towards the plus fabric.

Please post pictures to the flickr group – or link to your blog in the comments – so I can OOO and AHHH over your beautiful projects!
All the best!

Leave a comment

Filed under Pattern, Quilt Along, Quilting

Positive Space QAL – Making Columns As

The pattern will walk you through this process, but here are some pictures and tips to help you as you finish up your Column As.

Read on!

Continue reading

Leave a comment

Filed under Pattern, Quilt Along, Quilting