
Boo hoo! My storm at sea pillowcases are back to square one. Back to the drawing board! Hopefully these instructions will get me better results.
Continue reading for a whiny explanation of what went wrong…
Boo hoo! My storm at sea pillowcases are back to square one. Back to the drawing board! Hopefully these instructions will get me better results.
Continue reading for a whiny explanation of what went wrong…
Filed under Quilting
For one of my Christmas presents, I’m making some pillows using a Storm at Sea design.
To make these, I *thought* the easiest way would be to do paper-pieceing. It turned out to be a super complicated pain-in-the-rear (look ma, no swearing!).
Want to learn about paper piecing, too? Well this is where I’m started.
One very important key is to use the tiniest stitch-length possible, as this will perforate the paper nicely, making it easier to remove when you are ready.
What’s a little bogus about those directions, and most paper-piecing directions I’ve read, is that it relies on your ability to see through the paper and any other fabrics you have already sewn. How are you supposed to be able to look through so many layers and know that the fabric piece is aligned correctly on top?
For instructions on how I go about paper piecing, continue reading.
Filed under Quilting, Techniques
Because I am a silly head, I decided that this year was THE year I needed to make an advent calendar. So I set aside the major projects I have to complete for Christmas gifts and settled into making this guy:

It’s not the best picture, but here’s another couple of looks:


Each of the numbers are hand appliqued onto a pocket. I used a high quality felt so that I didn’t have to use any interfacing or machine stitching for the applique, and I wouldn’t have to worry about fraying. I also attached gold rick-rack weighted with gold beads to each pocket to use as a marker to check-off the days ’till Christmas. Someday I’ll fill the pockets with treats and maybe even nice notes directing the the recipient to perform a task in the spirit of the season, but my son’s a bit young for that now. It’s quilted with gold thread and the back has pockets to hold a dowel so that the calendar is able to hang.
The pocket design, number templates, and the idea for the dowel-holding pockets on the back came from this tutorial from Sew Mama Sew. At first I had tried to make simple rectangles that I would sew directly onto the backing (like this other adorable advent calendar) but it was a disaster. My “squares” were amorphous blobs with no sharp corners or parallel lines.
Anyway, I have to admit I’m really proud of this project! Once again I rolled the backing fabric over to the front for the binding – my new favorite trick! This meant that I had to applique my triangular dowel holders onto the back, rather than have them sewn inside the binding. Definitely worth it, as I currently hate bias tape.
Now back to my gifts!
I’m so happy to be back on my blog, posting about projects I’ve actually completed! I haven’t written since July, but I have a good excuse: I’m pregnant with our second baby! We’re due at the end of March. I found out in July and the celebrating was cut short by some serious first-trimester nausea.
Lucky for me, the second trimester brought about a huge relief from sickness and a little burst of energy (as much as possible considering I’m up at 4am for my work-from-home job, and playing all day with my soon-to-be-two-year-old son). Extra lucky, this surge of energy has coincided with me being able to make some of my Christmas presents this year.
So here’s the first completed project, soon to be gifted over the Thanksgiving weekend:

A nap-sized quilt for my husband’s aunt/godmother. We haven’t seen her in over two years and she’s making a special trip for the holiday. We’re going to go ahead and give her this gift this weekend rather than ship it out to California in December.
Here’s the back:

This design is from “The Modern Quilt Workshop” book.
This quilt was fun and relatively simple to make! It’s sort of a log-cabin type assembly. However, my stupid pregnant brain made so many mistakes that I almost cried twice over this silly blanket. When I assembled the quilt-top I laid it out and admired it with my husband. It took me about five minutes to realize that one of my blocks was upside-down. I had to wait a day and spend an hour fixing the square. Then I assembled the back, sewing the wrong side to the right side of the fabrics twice. This was a really labor-intensive mistake because I had set my machine to doing a really tight stitch-length. Boooo! So another hour had to be spent fixing the back. THEN I laid out the whole quilt to be basted, taping it down to the floor with painter’s tape after having my husband move all of the kitchen furniture out of the way. I was just about to insert my first safety pin for basting when I realized that darn block was STILL UPSIDE DOWN! I had spent an hour removing it and then sewing it back in THE WRONG WAY. D’OH! It was sort of a happy accident because I realized the block would look better switched with it’s neighbor to the north anyhow, so I rearranged both of those blocks, sewed them in place correctly and finally was able to baste the beast. UGH!
Anyway, I did a basic stippling quilt design and I also did a new trick: I made the backing big enough to roll over to the front for the binding. This was SO MUCH easier than messing with making bias tape, or even sewing on pre-made bias tape. I’m a believer!
I hope Aunt Linda enjoys her present, and that you all like it, too! I’m pretty proud. Despite all of the errors, it all came out looking nice and I really like my color choices. I also am proud of the backing because not only did I design it myself, but I utilized fabrics I had on hand rather than going out and buying more.
I have two more big Christmas gift projects in the works that I can’t wait to share with you all! And YES one of them is finally the finish of Grace’s Art Quilt.
Filed under Quilting
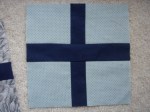
Look at me, being a member of a community and what-not. I’ve never participated in a bee or even a quilt-a-long, but when I read LuLuBloom’s post about her friend Errick, I really wanted to help.
She is making a quilt for an old high-school friend who is suffering from a colo-rectal cancerous tumor, which they named Trudy.

Lucia wants to make something to keep him snuggly and warm and hopefully in good spirits. Lucia called out for cross-blocks in masculine blues and grays. I made three and mailed them out to her this morning.

For the time being, Lucia thinks she has all the blocks she needs. She’s going to give the people who have volunteered some time to get the blocks made and mailed to her. If you feel like helping, keep track of her blog to see if she needs any more materials or blocks in the near future.
I think what she’s doing is really wonderful. I can’t imagine going through such a difficult experience, but I hope receiving a heart-felt, home-made, beautiful gift will help.
You can read more about Errick’s experience at his blog, found here.
And you can see all the quilt blocks being made here!
Filed under Challenges, Quilting
As I previously posted, I participated in Amy’s (from Amy’s Creative Side) One Thing, One Week challenge!

Even though I was out of town for two days, I was able to reach my goal, cutting out all of the pieces for this quilt.
And I also came up with a handy organizing technique. Because a lot of my blocks are complicated little puzzles, each one being unique, I laid out each block on a page of an unused scrapbook I had lying around. This way, I could easily just shut the book without the layout getting messed up, and without this project taking over my entire sewing room. Pretty neat!

Filed under Challenges
We went on a long-weekend vacation a couple of days ago. As I was packing I looked at the kindle case I had made a year or so ago. It was really lame, and my sewing has come along so much since then. It was too tight, made out of a weird flannel, and had some truly bizarre bias-tape detail. I wanted to make something better!
So I did a quick blog search and came across THIS POST from “The Sometime’s Crafter” from all the way back in September 2009.
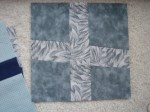
I didn’t have time to make a patchwork case. I did attempt one, but it was a disaster. Considering I was working all of this out in the last possible minute before we left, I opted for one piece of fabric, but added a spider-web type quilting design.
Here are some pictures:

And here’s a rough sketch of the quilting design I used:

Amy from Amy’s Creative Side is inspiring her readers to finish one task on one project in one week. What a great idea!
My goal is to cut out all of the pieces for the top of this quilt. My original goal was to have it assembled, but considering I’m heading out of town for two days, I thought just cutting everything out would be more realistic.
BTW I’m heading out of town to meet my niece Kylie (and to give her this blanket) and to meet Irene, owner of this quilt.
Filed under Challenges
Deeroo Designs had a lovely little fabric giveaway, and I was a winner! I got a whole slew of dutch wax prints.
You’ll have to excuse the quality of these photos. Our camera suffered death by sand and split milk sippy cup on our recent vacation. So these were taken on a cell phone:


Definitely at least two quilts jumping out at me from this gifted collection. A bright batch of blues, pinks, and teals waiting to get matched up with a solid gray, and another assortment of french toile inspired pieces.
There were many more fabrics in my gift, but the pictures just didn’t turn out. You’ll have to wait to see them once I transform them into creations!
Thanks, Deeroo!
Filed under Inspiration, Supplies
I just finished this blanket I have been working on for months upon months! It’s for my brand-new niece Kylie, who was born on June 23.

Why did this simple fleece blanket take me so long?
For one, I cut the fabrics out like an idiot – hacking away and assuming I’d have enough to make 12inch blocks. I didn’t. So this became the incredible shrinking quilt where the blocks are, I’m not sure, something like 9.5 inches squared all said and done.

It’s a super fun guitar and boom box flannel pattern. I learned a lot about quilting with this fabric. I learned that you must must must pre-wash it because it super shrinks (good think I learned that before I started this baby). I learned that it doesn’t care for a steam ironing, in that strips and squares will soon become ambiguous amoeba shapes. (I really should work on pressing rather than ironing my quilt pieces regardless of fabric choice).

I used a super light-weight denim for the back, and I love it! It’s soft and flexible, and has a tiny bit of a sheen to it.
I quilted free-motion stars with a silver metallic thread, and bordered the sashing with a pink metallic. Using these threads, I learned the importance of buying a proper metallic needle and using a bit of Sewer’s Aid on the spool.

I’m also so happy to report that I am finally using the proper tools! I used a free-motion foot that my mom found in storage, and a walking foot that a friend leant me. Let’s hope she doesn’t want it back anytime soon because I am definitely a walking-foot-believer now!
AND joy of joys my sewing pedal finally arrived! After having not shown up for 15 days, I decided to track the order… only to find that FedEx didn’t have that tracking number on record… because my order had never been fully submitted by the sewing supply company I used. WHOMP WHOMP. Well they finally shipped it out, and I’m enjoying sewing freely without concern that a small electrical fire might combust at any moment.

I used pre-bought double binding for this blanket, but never again. Time to be a big girl and learn how to make my own.
I do love my little embroidered patches, however : ) Yay for me being an aunt, and I hope my little niece spends lots of hours throwing awesome tummy-time parties on her new little mat (to be delivered at the end of this month when I meet my little squirt!).
Filed under Quilting


